
README
by ACM at CSUF
The official ACM at CSUF blog.
Dev Portfolio Project Final Part - Experiences & Projects
Introduction
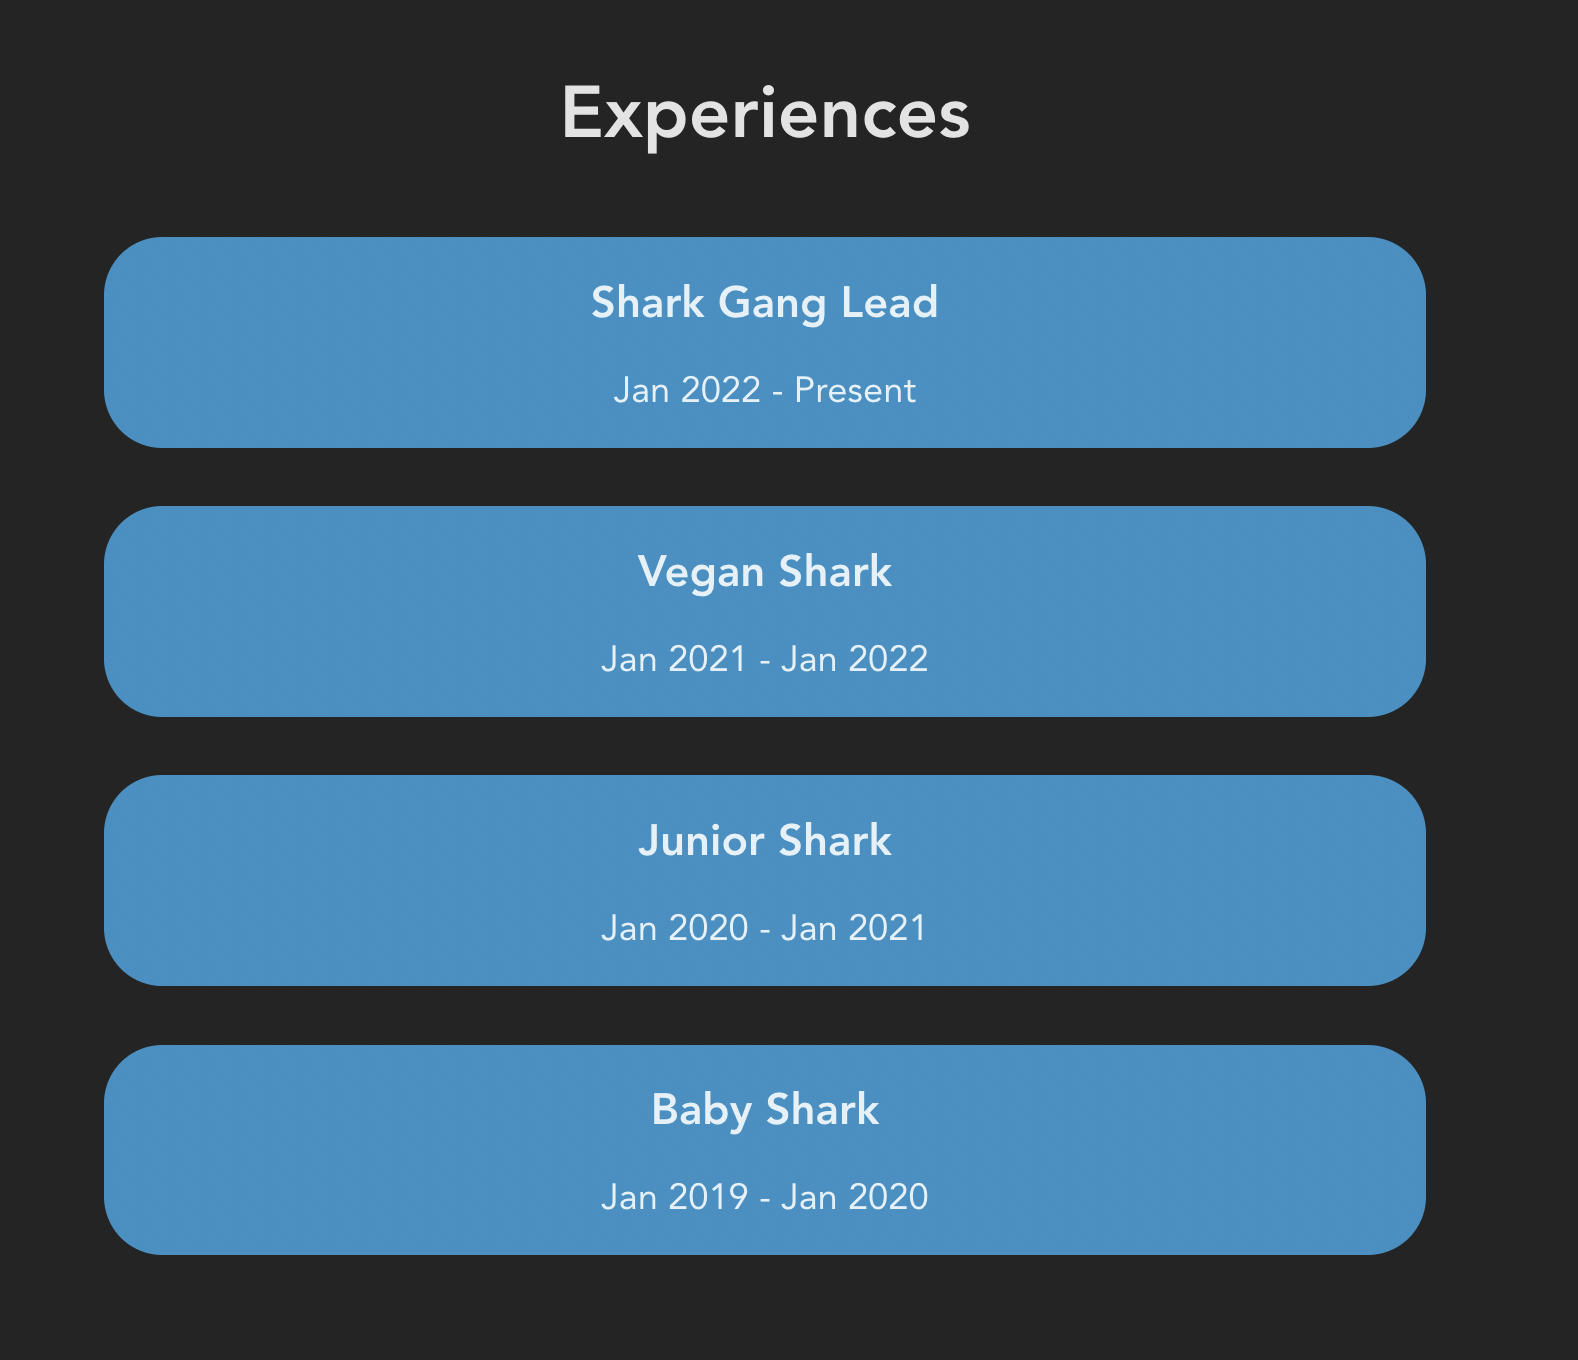
🥳 - In this blog, we'll guide you to create the last 2 components: Experiences and Projects for our portfolio website and it looks something like this

What'll be covered in this blog
🤓 - #each loop in Svelte ( we've learned this in part 2 )
Let's start
🤖 Create Experiences + Projects components
- Similar to what we did in previous parts, we'll create
Experiences.svelteandProjects.sveltein our components folder

NOTE: Don't forget to import our component in
App.svelte- our main Svelte fileApp.svelte
<script>
  import About from "./components/About.svelte";
  import Experiences from "./components/Experiences.svelte";
  import NavBar from "./components/NavBar.svelte";
  import Projects from "./components/Projects.svelte";
</script>

<main>
  <NavBar />
  <div>
    <About name={"Frank"} />
    <Experiences />
    <Projects />
  </div>
</main>

<style>
  main {
    margin: 1rem;
    font-size: 1.25rem;
  }
</style>
Experiences Component
- Similar to what we did in NavBar.svelte, we'll also create a JavaScript Array of Objects to hold our data and then use Svelte #each loop to render them to our browser
<script>
  const exps = [
    {
      title: "Shark Gang Lead",
      duration: "Jan 2022 - Present",
    },
    {
      title: "Vegan Shark",
      duration: "Jan 2021 - Jan 2022",
    },
    {
      title: "Junior Shark",
      duration: "Jan 2020 - Jan 2021",
    },
    {
      title: "Baby Shark",
      duration: "Jan 2019 - Jan 2020",
    },
  ];
</script>

<section class="container__exps" id="Experiences">
  <p class="header--big">Experiences</p>
  {#each exps as { title, duration }}
    <div class="container__exp">
      <p class="header__title">{title}</p>
      <p class="header__duration">{duration}</p>
    </div>
  {/each}
</section>

<style>
  .container__exps {
    margin-top: 10rem;
    display: flex;
    justify-content: center;
    flex-direction: column;
  }
  .header--big {
    font-size: 2.5rem;
    font-weight: 780;
  }
  .container__exp {
    background-color: #2C91C6;
    border-radius: 2rem;
    margin: 1rem;
  }
  .header__title {
    font-size: 1.5rem;
    font-weight: 600;
  }
</style>
SCROLLING EFFECT
Notice that we set the
id="Experiences"for our<section>since we want the scrolling animation that whenever we click an item on our Navbar it'll scroll to the section with the matching id, let's recall our Navbar code for this:NavBar.svelte
  const navItems = [
    { title: "About", url: "#About" }, // Scroll to section with id About
    { title: "Experiences", url: "#Experiences" }, // Scroll to section with id Experiences
    { title: "Projects", url: "#Projects" }, // Scroll to section with id Projects
  ];
And we also need to add a little bit of CSS to make the scrolling become smoother
app.css
html {
  scroll-behavior: smooth;
}
Projects Component
- Similar to what we did in Experiences.svelte, we'll also create a JavaScript Array of Objects to hold our data and then use Svelte #each loop to render them to our browser
<script>
  const projects = [
    {
      title: "acmcsuf.com",
      description: "Developed acmcsuf.com website",
      url: "https://github.com/EthanThatOneKid/acmcsuf.com",
    },
    {
      title: "Intro to Web Dev",
      description: "Beginner friendly Web Dev series by acmDev",
      url: "https://github.com/acmCSUFDev/intro-to-web-dev",
    },
    {
      title: "ICON",
      description: "Notion Canvas integration for students",
      url: "https://github.com/acmCSUFDev/ICON",
    },
    {
      title: "Food Tinder",
      description: "tinder for matching people by food places",
      url: "https://github.com/acmCSUFDev/Food-Tinder",
    },
  ];
</script>

<section class="container__projects" id="Projects">
  <p class="header--big">Projects</p>
  {#each projects as { title, description, url }}
    <div class="container__project">
      <a href={url} target="_blank">
        <p class="header__title">{title}</p>
      </a>
      <p>{description}</p>
    </div>
  {/each}
</section>

<style>
  .container__projects {
    margin-top: 10rem;
    display: flex;
    justify-content: center;
    flex-direction: column;
  }
  .header--big {
    font-size: 2.5rem;
    font-weight: 780;
  }
  .container__project {
    margin: 1rem;
  }
  .header__title {
    color: white;
    font-size: 1.5rem;
    font-weight: 600;
    transition: 400ms all;
  }
  .header__title:hover {
    color: #2c91c6;
  }
</style>
Now, you've successfully built up a decent website
🤩 🤩 You can always check the full code HERELet's see how're we going to deploy this in the next blog :D
October 28, 2022 • 6 min read
Dev Portfolio Project Part 3 - About
Introduction
🥳 - In this blog, we'll guide you to create the About component for our portfolio website and it looks something like this

What'll be covered in this blog
🤓 - Display image on website
- Props in Svelte
Let's start
🤖 Create About component
- Similar to our NavBar in part 2, we'll create an
About.sveltein our components folder

NOTE: Don't forget to import our component in
App.svelte- our main Svelte file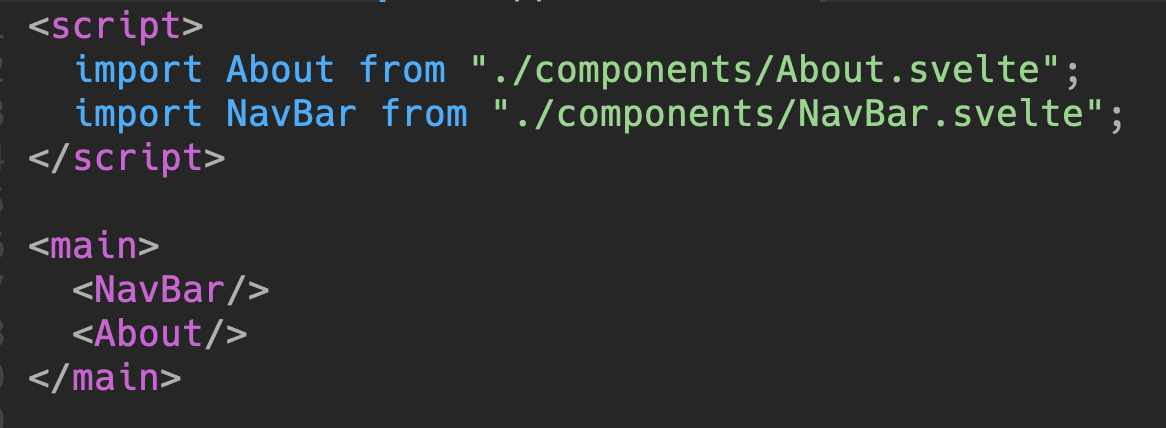
Display an Image on our website
- To display an image, we'll need to use the
<img src="" alt=""> </img>in HTML, but we first need to have an image link, it can be image link from the internet or your local image files
EX: Here's an online image link from Unsplash ( website for free images )
https://images.unsplash.com/photo-1586115457457-b3753fe50cf1?ixlib=rb-4.0.3&ixid=MnwxMjA3fDB8MHxwaG90by1wYWdlfHx8fGVufDB8fHx8&auto=format&fit=crop&w=1576&q=80EX: Here's a local image ( We downloaded a .svg image and put it in our assets folder )

Now, let's try to import our local image in our
About.svelte<script> import frank from "../assets/frank.svg"; // Import our local image </script> <section> <div class="container__about" id="About"> <!-- Import the frank image and have it as our image source with width = 180px and height = 123px --> <img width={180} height={123} src={frank} alt="" /> <p class="header--small">Hi, I'm Frank </p> <p class="header--big">WELCOME TO MY PORTFOLIO</p> </div> </section> <style> .container__about { display: flex; flex-direction: column; align-items: center; margin-top: 10rem; } .header--small { font-size: 1.5rem; margin: 2rem 0 0 0; font-weight: 600; } .header--big { font-size: 2rem; color: #2C91C6; font-weight: 700; } </style>
Then, after you save file, you should see the an image of Frank along with the welcome message
🦈 BONUS: Props in Svelte
👀 In any real application, you'll need to pass data from one component down to its children. To do that, we need to declare properties, generally shortened to 'props'. In Svelte, we do that with the
exportkeywordLet's see that with some code:
Passing props
App.svelte
<script>
  import About from "./components/About.svelte";
  import NavBar from "./components/NavBar.svelte";
</script>

<main>
  <NavBar/>
 <!-- we're passing a string with props name ```name```  to About component -->
  <About name="Frank"/>
</main>

<style>
	main {
		margin: 1rem;
		font-size: 1.25rem;
	}
</style>
Receiving props
About.svelte
<script>
  export let name; // receive props ```name```
  import frank from "../assets/frank.svg";
</script>

<section>
  <div class="container__about" id="About">
    <img width={180} height={123} src={frank} alt="" />
   <!-- We're using the props here -->
    <p class="header--small">Hi, I'm {name}</p>
    <p class="header--big">WELCOME TO MY PORTFOLIO</p>
  </div>
</section>

<style>
  .container__about {
    display: flex;
    flex-direction: column;
    align-items: center;
    margin-top: 10rem;
  }
  .header--small {
    font-size: 1.5rem;
    margin: 2rem 0 0 0;
    font-weight: 600;
  }

  .header--big {
    font-size: 2rem;
    color: #2C91C6;
    font-weight: 700;
  }
</style>
So, now if you change the props name into another string, it'll update the name in our About.svelte dynamically, so you can see that props will be helpful if we want to update dynamically instead of hard-coding the string
🥰 Now, you've successfully made the About component
🤩 🤩 You can always check the full code HEREOctober 21, 2022 • 5 min read
Dev Portfolio Project Part 2 - NavBar
Introduction
🥳 - In this blog, we'll guide you to create a navigation bar for your website
Prerequisites
🥸 - Cloned the website and able to run it locally ( If not: check previous part )
What you will learn
🤓 - Brainstorming about website layout
- Project folder + file structures
- Components
- Svelte #each loop
- JavaScript Date object
- ... many more
Let's Start
🤖 I. Website Layout
🌐 Here's what our final website will look like

Here's how it'll be broken down before jumping to code

II. Let's take a look at our project structure
👀 Here's what you will see when first start

Although there're lots of folders to look at, we only focus on the "src" folder

Here're the main files/folders you need to know
App.svelteis our main Svelte fileApp.cssis our main global CSS filelibfolder contains our components which we will rename to "components" later on instead
Let's do a quick clean up by removing things we don't need
App.svelte: Delete everything but the tags
App.css: Deleteplace-items:center( line 30 ) since it'll make everything become center and we don't want that
lib: Rename tocomponents
Delete
Counter.svelte
III. Good job, now let's start making our NavBar
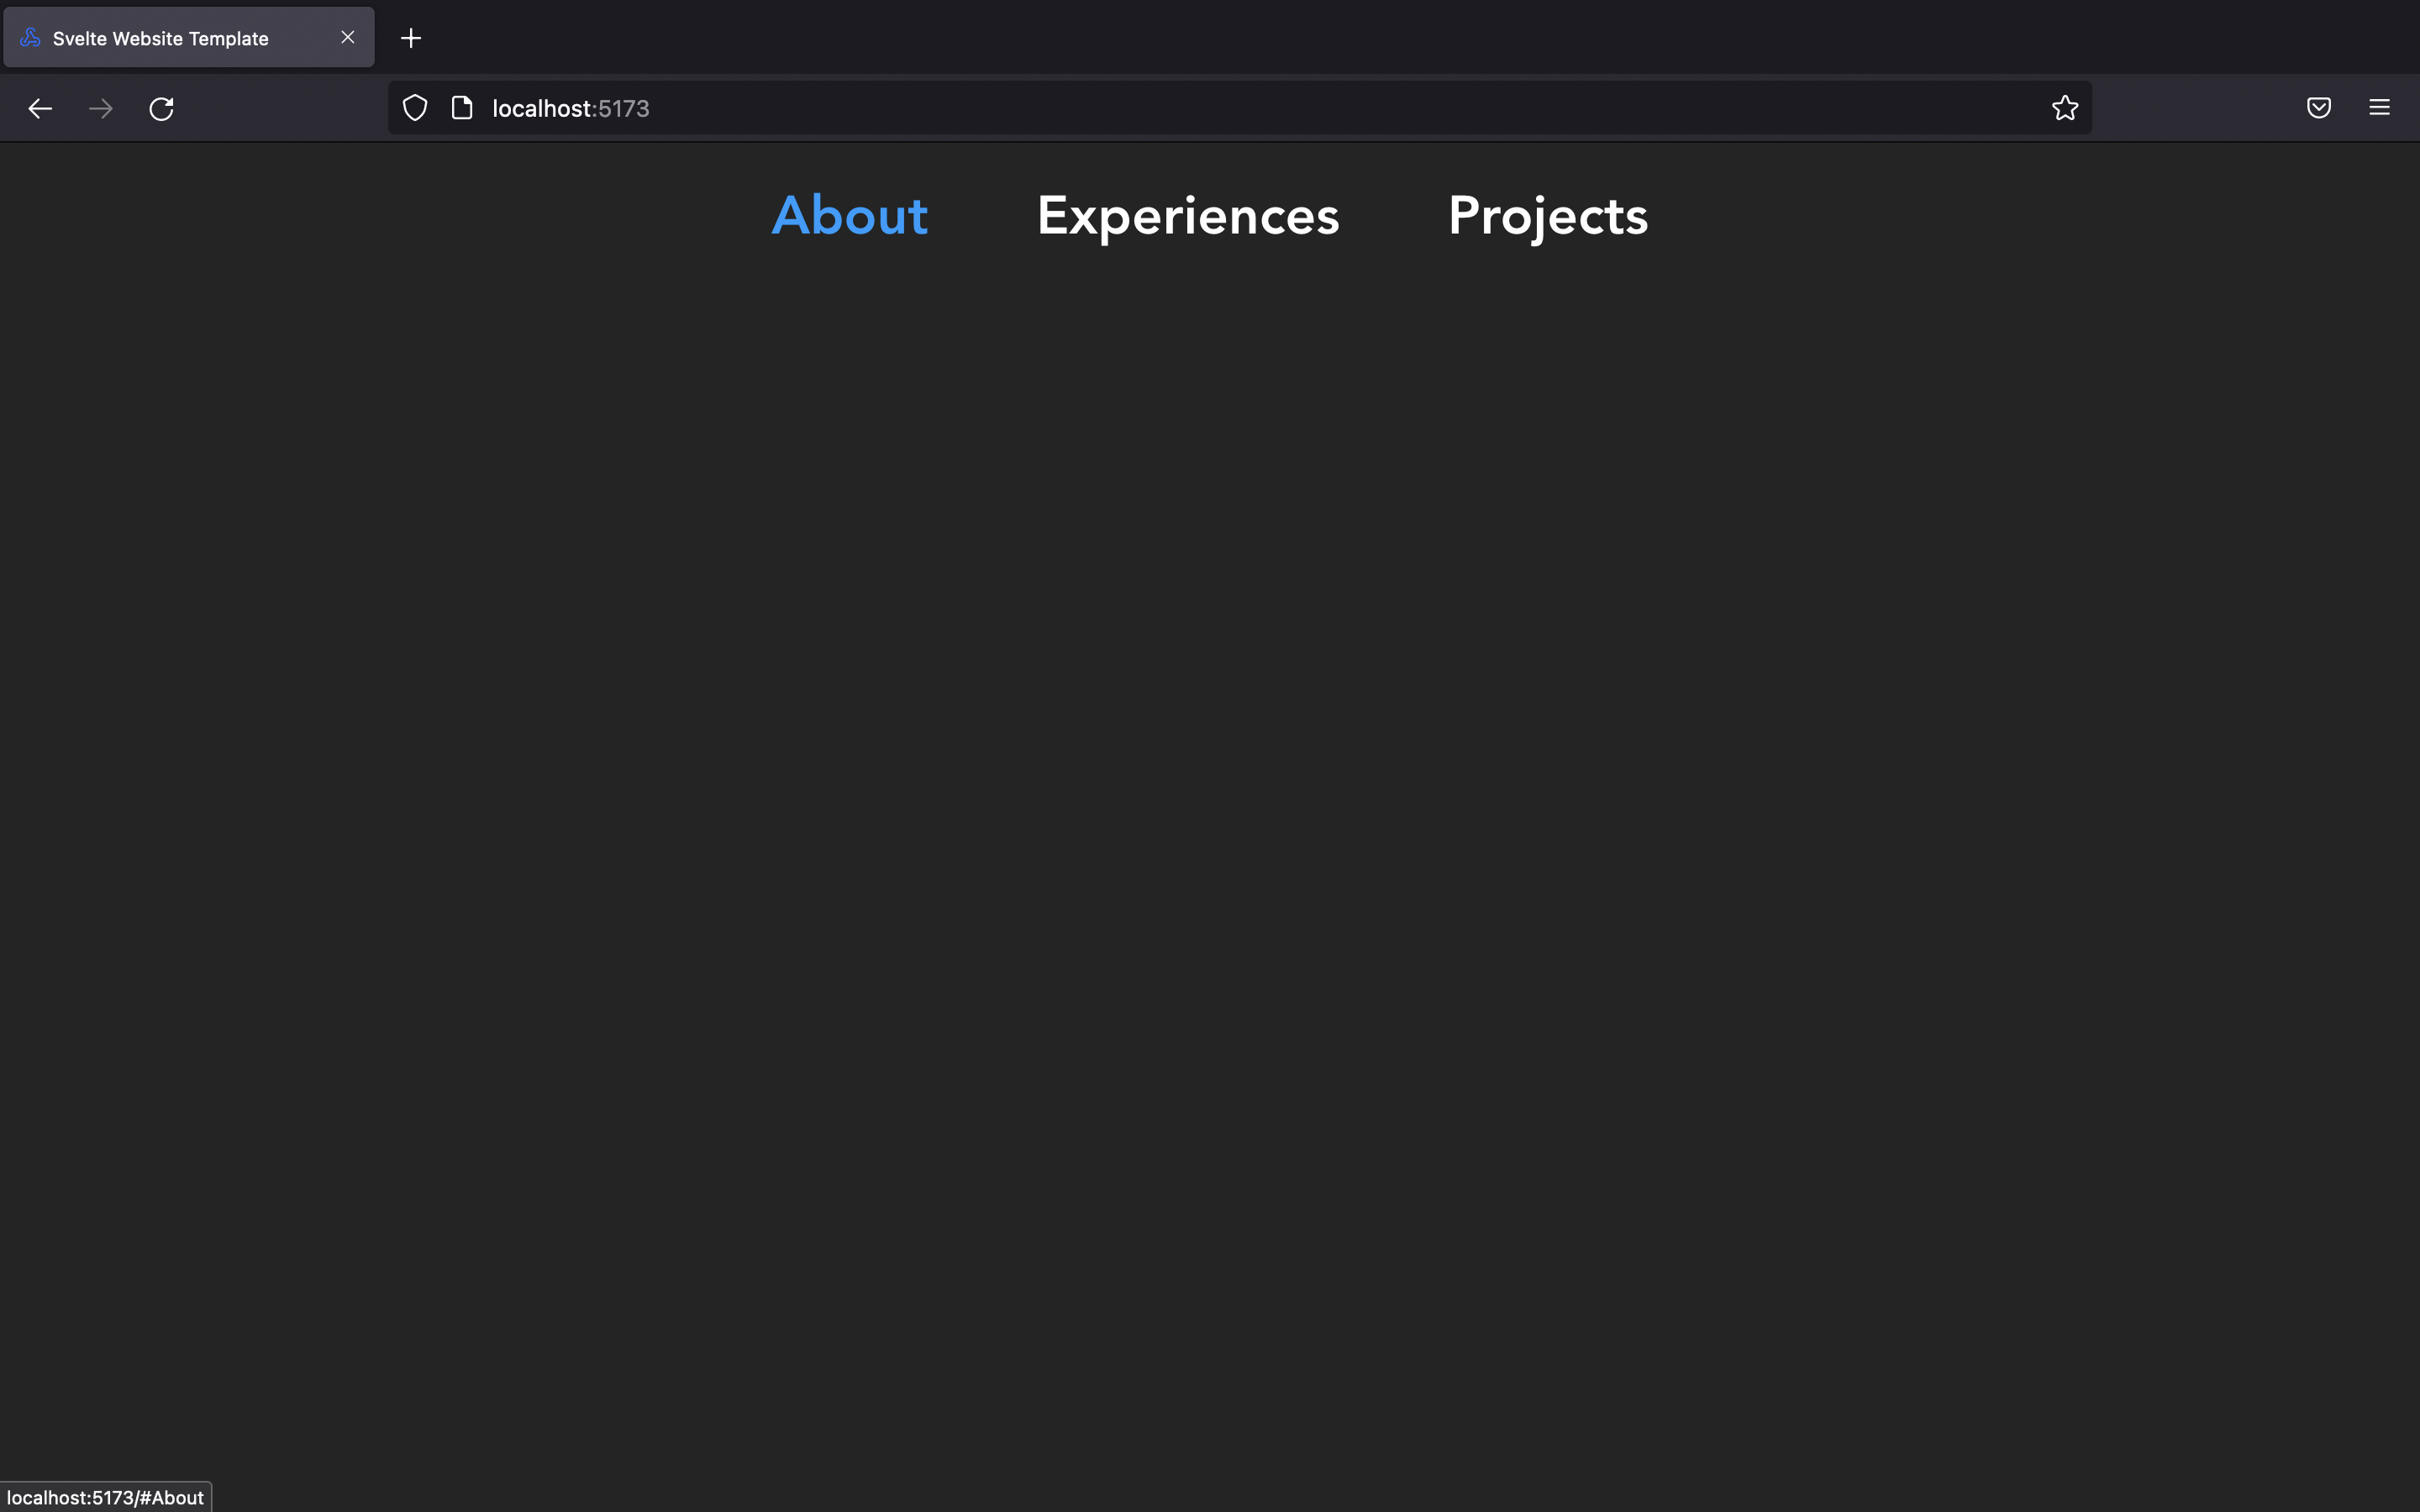
🥳 - Here's the NavBar we want to make:
About, Experiences, Projects are link to our sections, Thursday is the current date ( we'll use JavaScript Date Object to make this )

- In
componentsfolder, create a file calledNavBar.svelteand add the necessary tags as follow
Note: You don't need to have all tags as below, you can even have just a
<nav> </nav>tag and it's still valid in Svelte
Now, let's see how component works in Svelte
- Type anything between
<nav> </nav>( because if you want to display something, it has to be within a HTML tag ) in yourNavBar.sveltefile and save it
<p> </p>tag stands for paragraph
- Now, if you run your website using
npm run dev, it won't display that words because you have to import it inApp.svelte- our main Svelte file
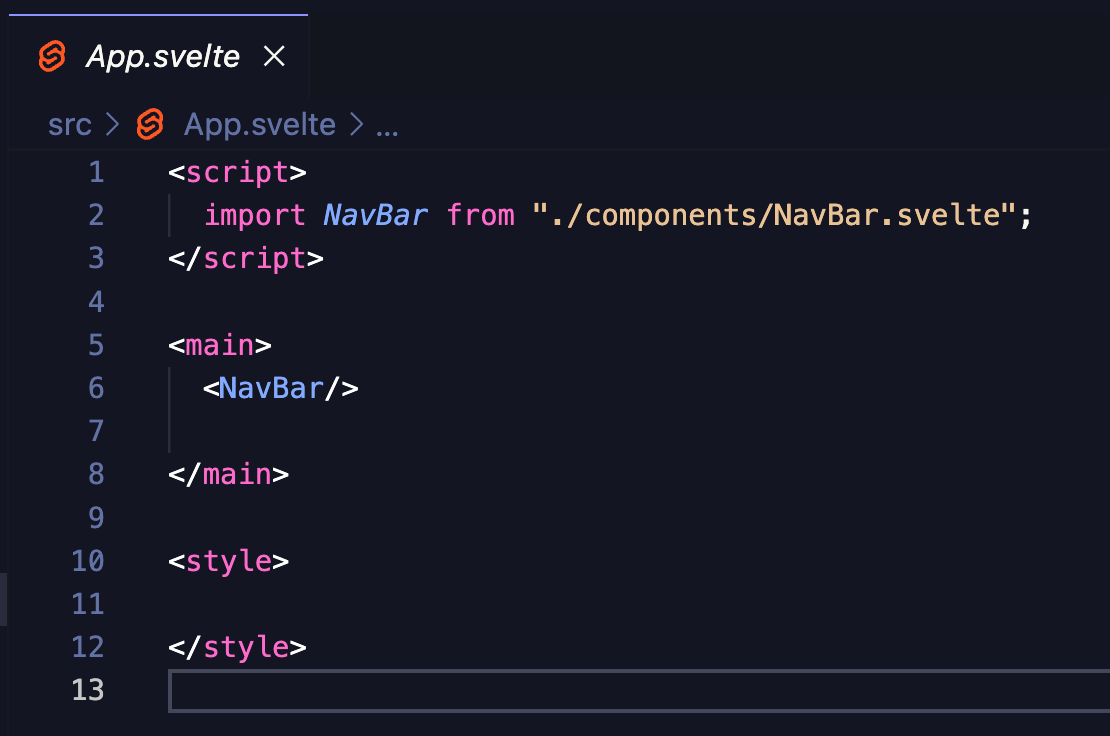
Tada !! that's how you import a component , when you run your website again, you should see it display NavBar content

Now, let's go back to
NavBar.svelteand start creating our navigation barYou can copy paste this code block and read the comments to understand more
<script>

</script>

<nav>
 <!-- We're creating a navigation bar with 3 items: About, Experiences, Projects\-->

     <section class="container__nav" id="/">
        <ol>
  <!-- the href=#something  links to each section so we can create a scroll to section feature\-->
           <li>
               <a href='#About' class="nav__item">
                  About
               </a>
          </li>
          <li>
               <a href='#Experiences' class="nav__item">
                 Experiences
               </a>
         </li>
      <li>
          <a href='#Projects' class="nav__item">
            Projects
          </a>
     </li>
   </ol>
</section>
</nav>

<style>
/* This is CSS style for our navigation bar */
   ol {
    list-style: none;
  }
  li {
    padding: 0;
  }
  .container__nav {
    display: flex;
    justify-content: center;
    align-items: center;
    flex-direction: row;
  }
  .nav__item {
    color: white;
    font-weight: 600;
    font-size: 2rem;
    margin: 0 2rem;
    transition: all 400ms;
  }
  .nav__item:hover {
    color: rgb(0, 157, 255);
  }
  .time {
    color: #1a1a1a;
    font-weight: 700;
    background-color: #2C91C6;;
    padding: 0.35rem;
    margin: 0 2rem;
    border-radius: 12px;
  }
</style>
Now, when you save the file, our NavBar will look nicer
⚠️ BUT, don't you think this block of code is kinda repetitive? we don't want to type the same thing every time we add a new item to our nav bar<ol class="container__nav" id="/"> <!-- the href=#something links to each section so we can create a scroll to section feature--> <li> <a href='#About' class="nav__item"> About </a> </li> <li> <a href='#Experiences' class="nav__item"> Experiences </a> </li> <li> <a href='#Projects' class="nav__item"\> Projects </a> </li> </ol>
💡 So, what we can do better by using Svelte #each loop, we'll create an Array of Objects that hold our nav items and then loop through every items and render it to the browserNavBar.svelte
<script>
  // @ts-nocheck
  history.scrollRestoration = "manual" // Prevent automatic scrolling
  const navItems = [
    { title: "About", url: "#About" },
    { title: "Experiences", url: "#Experiences" },
    { title: "Projects", url: "#Projects" },
  ];

</script>

<nav>
  <section class="container__nav" id="/">
    <ol class="container_nav" id="/">
      {#each navItems as { title, url }}
        <li>
          <a href={url} class="nav__item">
            {title}
          </a>
        </li>
      {/each}
    </ol>
  </section>
</nav>

<style>
   ol {
    list-style: none;
  }
  li {
    padding: 0;
  }
  .container__nav {
    display: flex;
    justify-content: center;
    align-items: center;
    flex-direction: row;
  }
  .nav__item {
    color: white;
    font-weight: 600;
    font-size: 2rem;
    margin: 0 2rem;
    transition: all 400ms;
  }
  .nav__item:hover {
    color: rgb(0, 157, 255);
  }
  .time {
    color: #1a1a1a;
    font-weight: 700;
    background-color: #2C91C6;;
    padding: 0.35rem;
    margin: 0 2rem;
    border-radius: 12px;
  }
</style>
JavaScript Date Object
📆 Display the current date with custom parameters
We can do that in the
<script> </script>that allows us to use JavaScript magiclet time = new Date(Date.now()); // Create Date Object const options = { // We'll need this option for toLocaleDateString() method later on to display on the weekday weekday: "long", };
Then we can display it in our html like this to display current weekday:
<p class="time">{time.toLocaleDateString(undefined, options)}<p>
Here's the full code for
NavBar.svelte<script> // @ts-nocheck history.scrollRestoration = "manual" // Prevent automatic scrolling const navItems = [ { title: "About", url: "#About" }, { title: "Experiences", url: "#Experiences" }, { title: "Projects", url: "#Projects" }, ]; let time = new Date(Date.now()); const options = { weekday: "long", }; </script> <nav> <section class="container__nav" id="/"> <ol class="container__nav" id="/"> {#each navItems as { title, url }} <li> <a href={url} class="nav__item"> {title} </a> </li> {/each} <p class="time">{time.toLocaleDateString(undefined, options)}</p> </ol> </section> </nav> <style> ol { list-style: none; } li { padding: 0; } .container__nav { display: flex; justify-content: center; align-items: center; flex-direction: row; } .nav__item { color: white; font-weight: 600; font-size: 2rem; margin: 0 2rem; transition: all 400ms; } .nav__item:hover { color: rgb(0, 157, 255); } .time { color: #1a1a1a; font-weight: 700; background-color: #2C91C6;; padding: 0.35rem; margin: 0 2rem; border-radius: 12px; } </style>
Now, you've successfully made the navigation bar
🤩 🤩 You can always check the full code HEREOctober 13, 2022 • 10 min read
Dev Portfolio Project Part 1 - Getting Started
Introduction
🥳 - This is a beginner friendly series made by acmDev team with the goal to help beginner developers create their first website using Svelte ( Javascript framework to build website )
What'll be covered in this blog
🤓 - Required installation for the project
- Setup the project ( clone the repo )
- Run the project locally
Let's start
🤖 A. Technology Installation:
- VSCode ( text editor - where you'll code ) - Required
- Node.js v16+ ( JavaScript environment to help you install Svelte later on ) - Required
- Note for Ubuntu/Tuffix users: Refer to the instructions at the bottom of the page
- Svelte Plugins ( after you've downloaded VSCode, open Extensions and search for Svelte to install the plugins - it helps you highlight code and autocomplete with Svelte syntax) - Required
- Git ( for collaboration purpose and you'll need to use this in real world but not necessary for this project ) - Optional
B. Setup the project:
Project Template Link
1. Clone the repo ( 2 ways )
- Using Git ( You'll need to Download Git first )
- Type the command
git clone https://github.com/acmCSUFDev/website-template.gitin your terminal to clone
- Download the ZIP file from this repo ( Beginner Friendly )

2. Open with VSCode
- Once you've cloned our website template, UNZIP the folder if you choose method 2, then open the folder you've just unzipped in VSCode

C. Run the project locally
-
Have Node.js installed.
-
In your VSCode, in the project folder, open Terminal and type
npm install -
After npm install, you should see a folder called node_modules which indicated you've used npm install correctly
-
Run your website by typing and click on the link provided
npm run dev

After you click on the link provided, you should see our beautiful Svelte template :) congrats
🤩 Note on installing Node.js on Ubuntu/Tuffix
By default,
sudo apt install nodejswill install node v10 which is incompatible with Svelte. To remedy this, first uninstall the existing nodejs and npm installation withsudo apt remove nodejs npmand install Node Version Manager usingwget -qO- https://raw.githubusercontent.com/nvm-sh/nvm/v0.39.2/install.sh | bashAfterwards, restart your terminal to load the new
nvmcommand.Now run
nvm install 16andnvm use 16to install and set node v16 as the default versionRun
node -vto verify the correct version is now in useOctober 13, 2022 • 3 min read
Design Pattern Discussions #1: Dependency Injection 💉
Do you need your services now? Do you need them to be able to be swapped for others with a shared interface? Are you tired of instantiating everything where and when you need it? Well, there’s already a solution to this called dependency injection!
…
But what does that mean?
Dependencies
To know what we’re talking about, we need to define what we’re talking about. In this case, a dependency is simply a class that offers functionality to another.
Example:
Class A creates, retrieves, updates, and deletes (CRUD) posts on a specific arcade game forum.
But when we want to retrieve those posts, we also want to retrieve comments made on it.
Class B handles the CRUD for comments.
If Class A wants to send off a post with all of its comments, it must use some functionality from Class B, making Class B a dependency of Class A
—
That makes sense, we should be able to use our code from anywhere so we can reuse already written tools. So let’s take a look at this with some example code. (We’ll be looking at C#)
public class A
{
 private B bService;
 public A()
 {
   bService = new B();
 }

 //...
}
Not bad so far, we have A and it can use B! The real world is not so forgiving though, A and B are sure to have more dependencies right? We need to call the database to get the posts and comments, as well as the users who are making them. Alright, let’s see how that looks.
public class A
{
 private B bService;
 private PostRepository postRepository;
 private UserRepository userRepository;

 public A()
 {
   postRepository = new PostRepository();
   userRepository = new UserRepository();
   bService = new B();
 }

 // ...
}

public class B
{
 private CommentRepository commentRepository;
 private UserRepository userRepository;

 public B()
 {
   commentRepository = new CommentRepository();
   userRepository = new UserRepository();
 }

 // ...
}
And what if we have something that needs even more dependencies?
public class CompanyService
{
   private AuthenticatedUserModelProvider _authenticatedUserModelProvider;
   private CompanyRepository _companyRepository;
   private CompanyViewsRepository _companyViewsRepository;
   private CustomFieldDefinitionService _customFieldDefinitionService;
   private Mapper _mapper;
   private UserAccountService _userAccountService;
   private SearchlightEngine _searchlightEngine;
   private CodeDefinitionService _codeDefinitionService;
   private CacheClient _cache;
   private CacheInvalidator _cacheInvalidator;
   private Logger<CompanyService> _logger;
   private Validator<CompanyModel> _validator;

 public CompanyService()
 {
     _authenticatedUserModelProvider = new AuthenticatedUserModelProvider(...);
     _companyRepository = new CompanyRepository(...);
     _companyViewsRepository = new CompanyViewsRepository(...);
     _mapper = new Mapper(...);
     _searchlightEngine = new SearchlightEngine(...);
     _customFieldDefinitionService = new CustomFieldDefinitionService(...);
     _userAccountService = new UserAccountService(...);
     _codeDefinitionService = new CodeDefinitionService(...);
     _cache = new CacheClient(...);
     _cacheInvalidator = new CacheInvalidator(cacheName);
     _logger = new Logger<CompanyService>(...);
     _validator = new Validator<CompanyModel>(...);
 }
}
Oh… this is getting a bit complicated! Imagine if all of the ellipses were more classes being instantiated to allow this CompanyService to be made, it would be a total mess. And what if we wanted to use a different cache or mapper? Would we have to change this code to allow other ones to be used?
What if we had a separate tool that provided these dependencies to A, B, and the CompanyService? That’s exactly what dependency injection (DI) sets out to do. At runtime, A will ask DI for B, the PostRepository, and the UserRepository. It is DI’s job to construct these classes and provide them, rather than the classes themselves needing to worry about managing the dependencies of the dependencies. This idea that the class should not worry about managing dependencies adheres to the idea of Inversion of Control.
An example of a dependency injection is constructor injection, where the classes made by DI are passed to the class’s constructor. This is done by having interface parameters for the class that can allow any class that implements the interface to be injected into it.
What is an interface?
Also called an abstract class, an interface is just a type definition that can not be directly instantiated like a normal class. It is only to define what methods/members will be in a class. In C#, it is good practice to name interfaces starting with a capital I to denote that it is an Interface.
Example:
public interface IQuadrilateral
{
 public double Area();
 public double Perimeter();
}

public Square : IQuadrilateral
{
 private double side;

 //...

 public double Area()
 {
   return side * side;
 }

 public double Perimeter()
 {
   return side * 4;
 }
}

public Rectangle : IQuadrilateral
{
 //...
}
This may sound a little confusing, so let’s take a look at A and B when using constructor dependency injection, rather than instantiating classes.
public class A
{
 private IBService bService;
 private IPostRepository postRepository;
 private IUserRepository userRepository;

 public A(IBService b, IPostRepository postRepo, IUserRepository userRepo)
 {
   bService = b;
   postRepository = postRepo;
   userRepository = userRepo;
 }

 // ...
}

public class B : IBService
{
 private ICommentRepository commentRepository;
 private IUserRepository userRepository;

 public B(ICommentRepository commentRepo, IUserRepository userRepo)
 {
   commentRepository = commentRepo;
   userRepository = userRepo;
 }

 // ...
}
Just like the previous example of A and B, both of these classes need dependencies but now have them coming as parameters in the constructor. At runtime, DI figures out what classes need to be injected based on the interface. This is also convenient since the UserRepository can be made once and passed along to both A and B.
As seen in the interface example as well, what if we have an interface with multiple implementations that needs to be injected? This makes interchanging classes easy, like if we have an IFood interface, we can inject a Sushi or CornDog class.
There is more to be learned about dependency injection, and these examples are just one way of implementing it. Check out some of these sources for more information and how to use it:
https://learn.microsoft.com/en-us/dotnet/core/extensions/dependency-injection
https://www.tutorialsteacher.com/ioc/dependency-injectionTune in for Part 2 of Design Pattern Discussions (DPD) coming soon(ish)!
October 6, 2022 • 7 min read
What's poppin in acmcsuf.com v3.0?
acmcsuf.comv3.0This release marks the completion of the ACM CSUF website v3.0 milestone
💫 Spring '22 semester sprint
- Contributors: @EthanThatOneKid, @anhduy1202, @MohamedHabarneh, @adityashah6, @janiljohn, @jaasonw, @Angus-1, @hhoang91, @karnikaavelumani, @NLTN, @TRA3H, @AaronLieb, @Angel-Armendariz
- Project Board: https://github.com/EthanThatOneKid/acmcsuf.com/projects/3
- Reflection: We learned how to learn from one another by participating in the code review cycle on GitHub, suggesting ideas, or asking questions during coding sessions or on Discord.
Contributors
During the Spring 2022 school semester, the acmcsuf.com team accomplished another great number of feats. This semester we gained an additional 8 new members to the web dev team! Each contributor got a step closer into the field of website development and through this experience, they can take this knowledge to further improve their skills. Thank you to everyone for the contributions!
New to acmcsuf.com hub
- @github-actions made their first contribution in #300
- @jaasonw made their first contribution in #359
- @Angus-1 made their first contribution in #397
- @hhoang91 made their first contribution in #433
- @karnikaavelumani made their first contribution in #444
- @NLTN made their first contribution in #439
- @TRA3H made their first contribution in #457
- @AaronLieb made their first contribution in #460
- @Angel-Armendariz made their first contribution in #458
If you are interested in following along with us and becoming an acmcsuf.com v4.0 contributor, just watch out for any announcements on our blog (https://acmcsuf.com/blog) or the acmCSUF Discord server.
What's Changed
- Added createdAt to plaintext blogpost metadata by @EthanThatOneKid in #276
- Removed
asyncfrom non-async function in close-issue-channel.js by @EthanThatOneKid in #283 - Hotfix "Removed
asyncfrom non-async function in close-issue-channel.js" by @EthanThatOneKid in #284 - Make EventCarousel a vertical list by @diamondburned in #280
- Added workflow step to check for formatting in PRs by @EthanThatOneKid in #290
- Add DST check in ICAL parser by @EthanThatOneKid in #289
- Events: Join from new tab by @EthanThatOneKid in #293
- Events: Migrated from CSR to SSR in SvelteKit by @EthanThatOneKid in #288
- Add/Update officer Jacob Nguyen by @github-actions in #300
- Officer Automation: Disabled issue closing and minor bugfixes by @EthanThatOneKid in #301
- Added special colors to event items based on which path is hosting #2 by @EthanThatOneKid in #298
- Only send messages in open issue channels by @EthanThatOneKid in #291
- Added Intro to Figma project link by @mikeploythai in #304
- Combined format and lint check by @EthanThatOneKid in #306
- Updated Discord link, removed unnecessary links by @mikeploythai in #308
- Added action that copies event link to clipboard by @EthanThatOneKid in #311
- Fixed button hover effect by @EthanThatOneKid in #314
- Adding PWA support by @EthanThatOneKid in #316
- Added
npm run all👨💻 by @EthanThatOneKid in #319 - Update ARCHITECTURE.md by @EthanThatOneKid in #320
- Set up network-first service worker by @EthanThatOneKid in #321
- Added "copy title" action by @EthanThatOneKid in #315
- Add/Update officer Daniel Truong by @github-actions in #325
- Events: Added "add to calendar" actions to each event item by @EthanThatOneKid in #318
- Officer List: Integrated tier-based ordering by @EthanThatOneKid in #326
- Events: Force long words to break in event item description by @EthanThatOneKid in #331
- Fixing button hover effect by @anhduy1202 in #338
- Add/Update officer Angel Armendariz by @github-actions in #343
- Add/Update officer Jason Wong by @github-actions in #341
- Revert "Events: Force long words to break in event item description" by @EthanThatOneKid in #344
- Events: Force long words to break in event item description pt. 2 by @EthanThatOneKid in #345
- Resolved annoying 'css-unused-selector' warning messages by @EthanThatOneKid in #333
- Add/Update officer diamondburned by @github-actions in #350
- Set up Vitest and added some tests by @EthanThatOneKid in #337
- Show set amount of events on
acmcsuf.com/eventswhen DEBUG=1 by @EthanThatOneKid in #329 - Integrating dark and light mode
🎉 by @EthanThatOneKid in #352 - Add/Update officer Ibrahim Israr by @github-actions in #361
- Add/Update officer Stephanie Pocci by @github-actions in #363
- Add/Update officer Nurhaliza Hassan by @github-actions in #365
- Add/Update officer Nolan Lee by @github-actions in #367
- Add/Update officer Justin Stitt by @github-actions in #370
- Add/Update officer Iftekharul Islam by @github-actions in #372
- Add/Update officer Sami Bajwa by @github-actions in #374
- Add/Update officer Alan Cortez by @github-actions in #376
- Add/Update officer Kirsten Ochoa by @github-actions in #378
- Add/Update officer Minh Le by @github-actions in #380
- Add/Update officer Justin Stitt by @github-actions in #381
- Add/Update officer Joel Anil John by @github-actions in #383
- Add/Update officer Rina Watanabe by @github-actions in #386
- Add/Update officer Johnathan Carranza by @github-actions in #388
- Add/Update officer Alex Truong by @github-actions in #390
- 1 high severity vulnerability btw by @jaasonw in #359
- remove extra name property by @jaasonw in #357
- HBD AARON
👑 by @mikeploythai in #395 - Change color of officer title prefixes only by @Angus-1 in #397
- Darkmode: Fixed initial flash of light
📸 by @EthanThatOneKid in #396 - Events: Migrated custom ICAL parser from
DatetoTemporalAPI by @EthanThatOneKid in #391 - Implemented Svelte style directive where applicable by @EthanThatOneKid in #353
- Minor design tweaks by @mikeploythai in #405
- Nav bar and footer refactor by @mikeploythai in #401
- Revert "Minor design tweaks" by @jaasonw in #412
- Added '/create-html/ link by @mikeploythai in #421
- Added replaceHtmlWithExternalLinks function to utils.ts by @janiljohn in #431
- Updates dependencies by @MohamedHabarneh in #432
- Updated version to 2.0.0 by @MohamedHabarneh in #409
- Index refactor by @mikeploythai in #437
- Footer tweaks by @mikeploythai in #436
- fixed the logo path by @hhoang91 in #433
- Nav design tweaks by @mikeploythai in #435
- Added /apply link by @mikeploythai in #440
- "This week's event" changed to "Upcoming Events" by @karnikaavelumani in #444
- Fix/441 by @karnikaavelumani in #446
- About refactor by @mikeploythai in #442
- Updated page title by @NLTN in #439
- Added QR Code feature by @Angus-1 in #450
- Links in events description open in new tab by @janiljohn in #453
- enlarged font size on paths route by @TRA3H in #457
- f22apply by @AaronLieb in #460
- Changed padding to make all link area clickable in Blog by @hhoang91 in #463
- Removed
DEBUGfrom parse() by @EthanThatOneKid in #465 - Show sample data on blog by @MohamedHabarneh in #451
- Removed calendar emoji and replaced with blue calendar SVG by @karnikaavelumani in #469
- Renamed src/routes/blog/_testdata/posts.json → posts.ts by @EthanThatOneKid in #472
- Events: Set up simple ICAL parser integration testing by @EthanThatOneKid in #475
- Update CONTRIBUTING.md by @MohamedHabarneh in #454
- Replaced old 404 image with blank frank picture and text by @Angel-Armendariz in #458
Full Changelog: v2.0...v3.0
GitHub Discussion (Mirror): #491
Blog Post on acmcsuf.com (Mirror): https://acmcsuf.com/blog/491
GitHub Release (Original post): https://github.com/EthanThatOneKid/acmcsuf.com/releases/tag/v3.0
This discussion was created from the release What's poppin in acmcsuf.com v3.0?.June 2, 2022 • 14 min read
Git Good #1: Rewriting History
Welcome to part 1 out of ??? of my git series (super original title I know) covering slightly intermediate to advanced topics that you may or may not have been familiar with. I figured what better way to start this series than by covering some of what are possibly the most dangerous commands in git and when you might want to use them. This blog post will cover 2 methods to rewrite history.
WARNING: you almost NEVER want to rewrite history as it tends to end up being a great way to either shoot yourself in the foot, shoot someone else in the foot, or blow off the legs of everybody involved. If this is your own repository and you are the only contributor, then by all means, go off. If this is someone else’s repository then you should reconsider or instead consider using a git revert instead as it amends rather than rewrites history. However, if your intent is to erase commits from the commit log entirely then this guide is for you.
Scenario 1: You want to rewind to a specific commit, nuking all newer commits

What’s this? You accidentally directly pushed to the acmcsuf.com main branch and are now panicking because Karni might beat your ass the next time she sees you? Well there’s no need to fear because this is where dangerous git command # 1 comes into play.git reset --hard-
Head over to Github and copy the SHA of the commit you want to rewind to
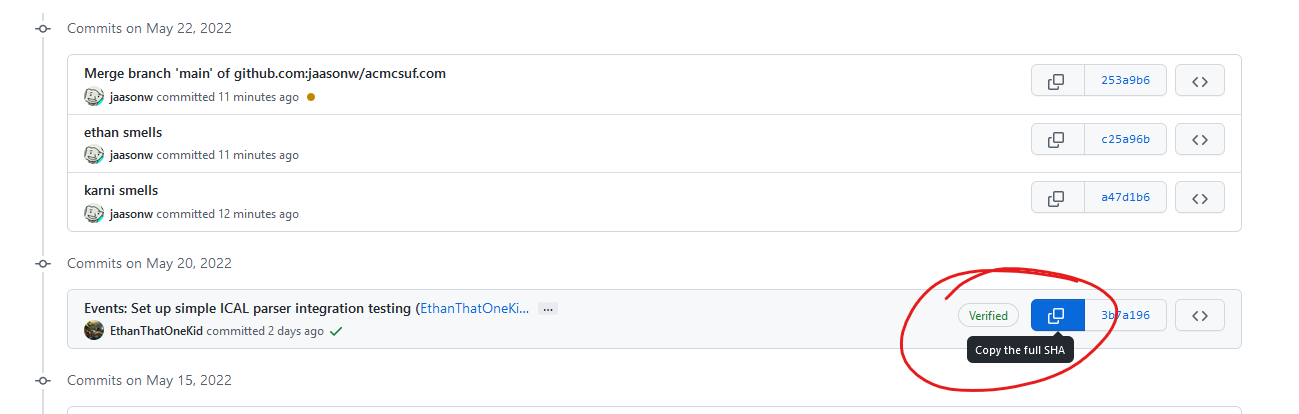
-
Head over to your terminal and run
git reset --hard [SHA]. This will rewind your local copy of the repository to the commit you want, discarding ALL modified changes. If you’d still like to keep the changes without committing them, just exclude the --hard

-
If you tried to git push now, your changes would be rejected as they would rewrite history in the upstream copy

-
To remedy this, simply run dangerous git command # 2: git push --force which should be pretty self explanatory in what it does, which is to force git to accept your changes whether it likes it or not

As you can see, our commits are now gone and your ass is now saved from Karni
Scenario 2: You want to remove a specific commit or multiple commits but keep the rest
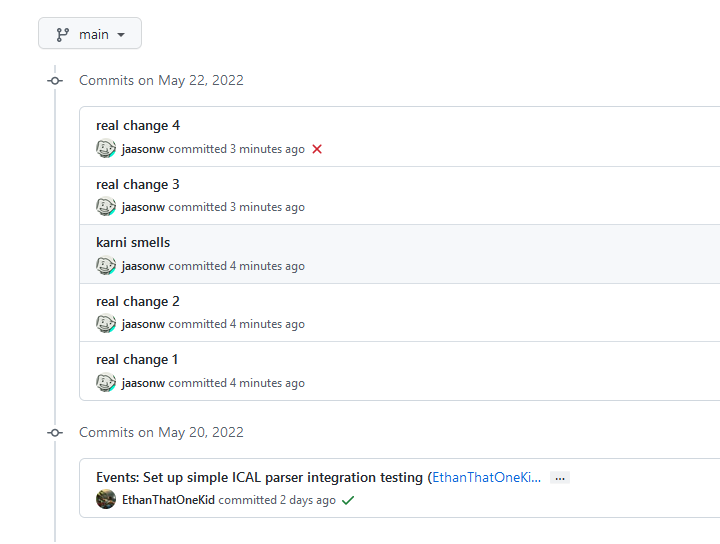
Uh oh, you committed the wrong commit to the wrong branch and then committed more commits on top of that commit, Karni’s really gonna beat your ass now. Don’t worry, once again I got you covered with dangerous git command # 3git rebase --interactive(or just git rebase -i)Admittedly this command tends to be less dangerous, less easy to mess up, and actually legitimately useful for doing things like splitting a pull request with 3 features into 3 separate branches. Rebasing could honestly be a whole blog post on its own but I’ll be covering just 1 specific use case here
-
Just like above, pick the commit you want to go back to and start picking from
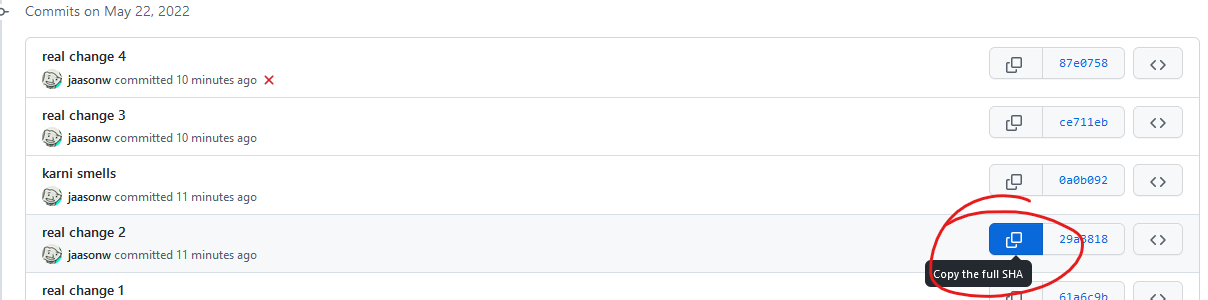
-
Head back over to your terminal and run
git rebase -i [SHA], this will open a text editor, either nano or vim (personally I don’t know how to use vim so if you get vim then just press i to put it in notepad mode and use it like notepad)

-
From here, you’ll see a list of commits past the commit you selected earlier, to remove a commit, either delete the line or replace pick with drop
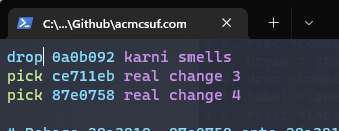
-
If you’re using vim it’s escape -> :wq to save and quit, if you’re using nano it’s ctrl + x
-
From here you may or may not have to resolve any rebase conflicts which are just like merge conflicts so go ahead and get those resolved if applicable
-
Once again, this rewrites history so you’ll have to use git push --force again and the commit in question should now be erased and your ass is once again saved from a beating

Thanks for reading and once again please use caution when using these as they are as dangerous as they are powerful and you can easily lose your own or someone else's commits in the process or create a merge conflict problem for someone else when they suddenly can't push to main. Best advice I can give to minimizing this kind of damage is to only use these commands on branches/forks that only you work on and to never do this on main.
Edit 6/8/2022: Make use of newly added code block support
May 23, 2022 • 5 min read
-
Participating in the ICPC 2022 SoCal Regionals
5 students made CSUF history on Saturday, February 26th at the ICPC 2022 SoCal regionals:

The event was held at Riverside City College. Check-in began in the morning, then breakfast was served at the event once we got in.
There was a practice session after breakfast to make sure the competition would go smoothly on the technical side and to make sure all the competitors were aware of the given development environment’s capabilities.
After the practice session, we had free lunch out of a Habit food truck. We then began the competition after the lunch break ended.
Once the time for the competition had run out, all the competitors left their battle stations that they had been hunched over for the last 5 hours. We then went back to the place where we originally ate breakfast. At that point, the results of the competition were not finalized; the results of the last fifteen minutes of code submissions were unknown so that we could experience a suspenseful ending ceremony.
In the end, a team from Caltech narrowly earned the highest score with the UCLA team coming in a close second. As for us, our 2022 teams scored the highest combined total score in CSUF x ICPC history
😆 If you are interested in learning valuable competitive programming skills, you can come to acmAlgo meetings throughout the semester where our acmAlgo officers will guide you down the mind-blowing rabbit-hole of programming. To learn more, register as a CSUF student on our Discord server to chat with our community members.
March 4, 2022 • 2 min read
Top 10 reasons to not comment your code
-
- It makes the code longer
-
- It makes the code uglier (its a weird gray)
-
- How do you even comment (its different for every language)
-
- no one be reading your code
-
- your comments are bad anyways
thank you for coming to my ted talk
January 25, 2022 • 1 min read
-
acmcsuf.com ♥ RSS
acmcsuf.com
♥ RSStl;dr: Check out our RSS feed on
https://acmcsuf.com/feed.xml!😎 What is RSS?
RSS is a specification built on top of XML which stands for Really Simple Syndication. Computer people tend to use RSS to keep track of things on the Internet that they want to be notified about when anything new is published. This technology is useful for the syndication of things like blog posts, but can really be used for all types of digital publications imaginable.
How do we leverage RSS?
Here on acmcsuf.com, our blog feature is an outlet for our community to publish computer science-related posts or in-depth updates/reflections about community events. In order to make sure people are notified as soon as a new post is published, we must be RSS-compatible. Lucky for us, RSS is really, really simple and only uses a single HTTP endpoint. You can find ours on
https://acmcsuf.com/feed.xml.How can you use RSS in your daily life?
There are many ways people choose to indulge in RSS feeds. One way is to use a simple piece of software found online (e.g. desktop application, browser extension, etc.). A simple search in your favorite search engine should give you an up-to-date result.
To subscribe to an RSS feed, all you need is a single HTTP endpoint commonly ending with
.rssor.xmlsince RSS is expressed as an XML (Extensible Markup Language) document. Copy our HTTP endpoint below to subscribe within your RSS feed manager.https://acmcsuf.com/feed.xmlNote: Other standards exist such as Atom and JSON feed and are often used as alternatives to RSS.
Choosing RSS feeds to follow
You're free to follow any publication that you like as long as you can find it online for free! For starters, you have
https://acmcsuf.com/feed.xml. If you have a favorite Subreddit, you can subscribe to its RSS feed using the RSS feed URL pattern,https://reddit.com/r/<your_subreddit>.rss(example:https://reddit.com/r/csuf.rss). Most blogs and major Internet platforms incorporate RSS into their sites, so it is up to you to keep an eye out for the [commonly orange] RSS logo! This symbol indicates the existence of an RSS feed.
Making your own RSS feed manager
If you are looking into learning more about RSS hands-on, you can actually interface with any RSS feed on the web as long as your favorite programming language has a trustworthy library for parsing RSS feeds (or at least XML documents).
Note: If your language of choice does not have such a library, you will just have to implement the entire RSS specification yourself, which is not particularly trivial, so I’d recommend finding a language that is capable to make things easier for yourself.
For instance, we use node-rss to format the RSS document found on
https://acmcsuf.com/feed.xml. Below are some libraries I found on GitHub that you can start with.RSS v2.0.1 Compatible APIs
Language Library Node.js node-rss Python feedparser Go gofeed See also
- https://en.wikipedia.org/wiki/RSS#History
- https://en.wikipedia.org/wiki/Web_syndication
- Documentary about the prolific programmer, co-founder of Reddit Aaron Swartz who co-wrote the RSS specification: The Internet's Own Boy: The Story of Aaron Swartz | full movie (2014)
Last updated
- 2022-11-05: Rename
/blog.xmlto/feed.xml.
January 25, 2022 • 3 min read
What's new in acmcsuf.com v2.0?
acmcsuf.comv2.0This release marks the completion of the ACM CSUF website v2.0 milestone
💫 Fall '21 semester sprint
- Contributors: @EthanThatOneKid, @diamondburned, @mikeploythai, @anhduy1202, @MohamedHabarneh, @dustinchavez1, @adityashah6, @janiljohn
- Project Board: https://github.com/EthanThatOneKid/acmcsuf.com/projects/2
- Reflection: We learned how to learn from one another by participating in the code review cycle on GitHub, suggesting ideas, or asking questions during coding sessions or on Discord.
Contributors
During the Fall 2021 school semester, the acmcsuf.com team accomplished many feats of engineering and broadened our technical horizons. This semester, we broke 10 (OMG!) total contributors in this repository! Each contributor took major steps forward in learning about open source web development and working in an organization-like setting with other human engineers. Congrats to everyone who contributed towards this release!
New to acmcsuf.com hub
- @anhduy1202 made their first contribution in #153
- @MohamedHabarneh made their first contribution in #157
- @dustinchavez1 made their first contribution in #163
- @adityashah6 made their first contribution in #176
- @janiljohn made their first contribution in #204
If you are interested in following along with us and becoming an acmcsuf.com v3.0 contributor, just watch out for any announcements on our blog (https://acmcsuf.com/blog) or the acmCSUF Discord server.
What's changed
This release at a glance
- Migrated from Sapper to SvelteKit in #147
- Created GitHub action that creates/archives Discord text channels based on GitHub issues in #165
- Added brand new 404 page in #176 (preview: https://acmcsuf.com/this/goes/nowhere)
- Added privacy policy page by in #255
- Minor bug fixes and site improvements in v1.1...v2.0
- Achieved v2.0 milestone
💫
Notable changes [Auto-generated]
- Migrated to SvelteKit (before the v1.0 milestone lol) by @EthanThatOneKid in #147
- Modified navbar.svelte such that menu will close when link clicked by @anhduy1202 in #153
- Fixed navigation tab bug by @dustinchavez1 in #163
- Created GitHub workflow that creates text channels on issue open by @EthanThatOneKid in #165
- Added Frank to 404 page by @adityashah6 in #176
- Created officer data workflow by @EthanThatOneKid in #186
- Fix Spacing component parameters by @diamondburned in #189
- Created
check_website.yamlworkflow and eliminated remaining lint errors by @EthanThatOneKid in #192 - Created GitHub Action that discards closed issue channels by @EthanThatOneKid in #190
- Added indentation checking with Eslint by @EthanThatOneKid in #199
- Discord Bot sends PR and new Issue comments into corresponding channel (Issue: 238) by @janiljohn in #239
- Added privacy policy page by @EthanThatOneKid in #255
- Created initial, read-only newsletters web interface by @adityashah6 in #244
Minor changes [Auto-generated]
- Fixed accidental space in about page, credited ACM W in nodeBuds page by @mikeploythai in #139
- Imported new members by @mikeploythai in #145
- Fixed bug on NodeBuds officer section (wrong officers showing) by @EthanThatOneKid in #146
- fixed links for the paths from the homepage by @MohamedHabarneh in #157
- Modify acm-select.svelte to create a custom select dropdown by @anhduy1202 in #156
- Refactored iCal parser to parse RRules by @EthanThatOneKid in #160
- fix the issues channel name for Issue Bot by @anhduy1202 in #175
- Refactored Spacing component to use CSS variables by @EthanThatOneKid in #184
- Welcomed Johnathan Carranza to acmCSUF F21 by @EthanThatOneKid in #188
- Removed SkipNavbarContent Component by @EthanThatOneKid in #191
- Removed unneeded arrow buttons for event carousel by @MohamedHabarneh in #178
- Stripped unwanted backslashes from event titles by @janiljohn in #204
- Switch from pinning to labeling for
scripts/close-issue-channel.jsby @EthanThatOneKid in #208 - Improved the officer update request workflow by @EthanThatOneKid in #217
- Fix path color by @anhduy1202 in #225
- Created
check_site_changes.shscript by @EthanThatOneKid in #229 - Added documentation for v2.0 workflows by @EthanThatOneKid in #222
- Created CODE_OF_CONDUCT.md by @EthanThatOneKid in #228
- Adjusted strange spacing in various places by @EthanThatOneKid in #233
- Create LICENSE by @EthanThatOneKid in #230
- Initialized a basic PR template by @EthanThatOneKid in #231
- Created
/newslettersentrypoint by @EthanThatOneKid in #236 - Refactor flex-box to grid (update) by @anhduy1202 in #241
- added link to apply for 2022 board positions by @mikeploythai in #253
- Added Size Limit for
node_modulesby @EthanThatOneKid in #248 - Integrated issue channel label blocklist by @EthanThatOneKid in #218
- Created initial, read-only newsletters web interface by @adityashah6 in #244
- Mike/2022 updates by @mikeploythai in #258
- Renamed COVID-19 Notice to COVID-19 Policy in footer by @mikeploythai in #260
- Added prefer-arrow-callback and func-style rules to our Eslint config by @EthanThatOneKid in #261
Full Changelog: v1.1...v2.0
GitHub Discussion (Mirror): #262
Blog Post on acmcsuf.com (Mirror): https://acmcsuf.com/blog/262
GitHub Release (Original post): https://github.com/EthanThatOneKid/acmcsuf.com/releases/tag/v2.0January 24, 2022 • 9 min read


